
Welcome To
mp3TrueEdit™ 3.2 (Touch)
A lossless MP3 and AAC audio editor*
TABLE OF CONTENTS
2.2. How to install the software
5.2. Features, menus and commands
5.3. Searching for MP3 or AAC audio files
5.4. Opening an MP3 or AAC file
5.5. Play and review an audio File
5.7. Selecting audio for editing or playback
5.9. Cut and paste a selection of the audio
5.10. Copy and paste a selection of the audio
5.11. Delete a section of the audio
5.12. Crop a section of the audio
5.13. Combine/append several audio files
5.15. Split an audio file into tracks
5.19. Exporting files and Tracks
5.20. Converting files and Tracks
6.1. Using the recording function
1. Introduction
![]() mp3TrueEdit™ 3.2 (Touch) is the latest
release of our audio editing family of applications with the user interface
completely rewritten for mobile devices. It is a simple to use and affordable
MP3 and AAC audio editor which was specifically written for quick and easy
editing of audio files, without losing any of the original quality! This can be
done because mp3TrueEdit knows about the internal structure of MP3 and AAC files
and does not need to decompress and recompress the audio to make its edits. mp3TrueEdit features also include: opening
very large audio files quickly • easily viewing and finding sections of audio •
cut, copy, paste, delete and crop operations • exporting audio files or
generating audio tracks • adding effects such as fade in/out • normalization
and silencing audio • changing pitch and tempo during playback or even when
converting to a new file format or settings • and finally recording of audio
files from within mp3TrueEdit or using an internal audio recording app or if
preferred by using your favorite external recording app.
mp3TrueEdit™ 3.2 (Touch) is the latest
release of our audio editing family of applications with the user interface
completely rewritten for mobile devices. It is a simple to use and affordable
MP3 and AAC audio editor which was specifically written for quick and easy
editing of audio files, without losing any of the original quality! This can be
done because mp3TrueEdit knows about the internal structure of MP3 and AAC files
and does not need to decompress and recompress the audio to make its edits. mp3TrueEdit features also include: opening
very large audio files quickly • easily viewing and finding sections of audio •
cut, copy, paste, delete and crop operations • exporting audio files or
generating audio tracks • adding effects such as fade in/out • normalization
and silencing audio • changing pitch and tempo during playback or even when
converting to a new file format or settings • and finally recording of audio
files from within mp3TrueEdit or using an internal audio recording app or if
preferred by using your favorite external recording app.
*Supported formats are MPEG-1/2/2.5 Audio Layer III (MP3) and Advanced Audio Coding - Low-Complexity profile (AAC-LC). ‘MP3 Pro’ or ‘MP3 free format’ files are not currently supported. AAC profiles other than LC are also not currently supported. Supported container file formats are MP3 (.mp3), AAC MPEG-4 (.m4a, .m4b, .mp4) and AAC ADTS (.aac). AAC audio files that are protected using Digital rights management (DRM) or other means are not supported.
Getting started with mp3TrueEdit - This manual will introduce you to the basic concepts of editing audio using mp3TrueEdit and it also contains useful tips and tricks which will help you to perform your editing effortlessly.
Practical applications – if you prefer to dive into a practical example, then visit our YouTube page (http://www.youtube.com/user/ithinkapps) to see some real world examples of what can be done.
Don’t forget when you purchased mp3TrueEdit you will also enjoy the full benefits that come with it – free online support and free priority e-mail support for the next 18 months.
We will do our best to answer all support queries within 1-2 business days, but do please check this manual first or go to the online FAQ at: https://ithinkapps.com/faq.html to check if your question has already been asked first.
To purchase a copy of mp3TrueEdit go to https://ithinkapps.com/downloads.html. We hope you enjoy using our product and any feedback from you using our contact form: https://ithinkapps.com/support.html would be very welcome as we strive to continually improve our software and support service.
1.1. New Features
To see a list of the latest features added to mp3TrueEdit and any additional release notes since this manual was produced, please see our FAQ topic: https://ithinkapps.com/tutorials.html#releases.
2. Installation
2.1. System requirements
mp3TrueEdit 3.2 (Touch) now joins our Desktop family of products and leads the way in fast lossless MP3 and AAC audio editing and is currently available on Android tablet and phone devices running Android 5.0 Lollipop and above or Apple iPhone and iPad devices running iOS 12 and above.
2.2. How to install the software
mp3TrueEdit is currently available for Android phone and tablet devices on Google Play store using the following link: http://play.google.com/store/apps/details?id=com.ithinkapps.mp3trueedit
It is also available on iPhones and iPads
using the following link:
https://apps.apple.com/us/app/mp3trueedit/id498443296
You may also be interested to know that there are other Desktop based versions of mp3TrueEdit available for Windows and Apple OS X computers. Please see out website www.ithinkapps.com for more details.
3. Software Upgrades
In most cases upgraded versions of mp3TrueEdit will be offered free of charge. However, we do reserve the right to charge for extra functionality introduced in new versions of our applications should we feel that any new functionality warrants an additional payment.
We also reserve the right to charge for a new major version of any of our software applications and cease to offer free maintenance upgrades for previous versions should this be deemed appropriate by us.
4. Uninstalling the software
To uninstall the software:
![]() On Android devices Run the ‘Settings’ app and select ‘Apps’
then press on the mp3TrueEdit entry and select ‘Uninstall’ and follow
the instructions. Please note: any edited audio files or projects in
the Apps local storage area will also be deleted.
On Android devices Run the ‘Settings’ app and select ‘Apps’
then press on the mp3TrueEdit entry and select ‘Uninstall’ and follow
the instructions. Please note: any edited audio files or projects in
the Apps local storage area will also be deleted.
![]() On iOS devices press and hold the green mp3TrueEdit icon and
wait for the (x) to appear in the top left corner of the icon. Then press this
(x) button and select Delete to uninstall the app. Please note: any
edited audio files or projects in the Apps local storage area will also be
deleted.
On iOS devices press and hold the green mp3TrueEdit icon and
wait for the (x) to appear in the top left corner of the icon. Then press this
(x) button and select Delete to uninstall the app. Please note: any
edited audio files or projects in the Apps local storage area will also be
deleted.
5. Editing with mp3TrueEdit
5.1. Help Guides
When you first start mp3TrueEdit you will encounter a number of popup guides that will introduce you to some of the basic features of mp3TrueEdit. These guides will display themselves at appropriate points while editing an audio project but can be cancelled at any time.
5.2. Features, menus and commands
The various features, menus and commands within mp3TrueEdit can be activated from three icons in three corners of the app.
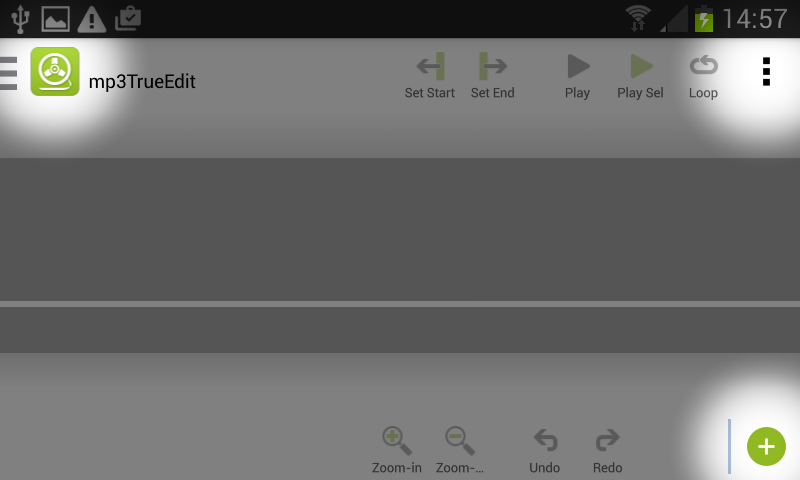
![]() To navigate the Menu commands press on the three vertical dots in
the top right corner of the screen.
To navigate the Menu commands press on the three vertical dots in
the top right corner of the screen.
![]() To switch between the various feature screens such as Edit, Record,
Tags and Settings, press on the three horizontal lines or the mp3TrueEdit
logo in the top left of the screen.
To switch between the various feature screens such as Edit, Record,
Tags and Settings, press on the three horizontal lines or the mp3TrueEdit
logo in the top left of the screen.
![]() When editing an audio file or project various commands and effects
can be done using the popup menu box which is launched by pressing the plus
sign inside a green circle on the bottom right of the screen. When a popup
command is used it can easily be repeated using the ‘last used command icon’
next to the plus sign. Additional effects are located in an Effects overflow
menu.
When editing an audio file or project various commands and effects
can be done using the popup menu box which is launched by pressing the plus
sign inside a green circle on the bottom right of the screen. When a popup
command is used it can easily be repeated using the ‘last used command icon’
next to the plus sign. Additional effects are located in an Effects overflow
menu.
![]() There are also two toolbars located at the top and bottom of the
screen that contain commands that are useful when editing audio and are always
shown. The top toolbar contains commands for selecting, playing and looping
audio. The bottom toolbar contains commands for zooming in and out, undo and
redo and the ‘last used command’.
There are also two toolbars located at the top and bottom of the
screen that contain commands that are useful when editing audio and are always
shown. The top toolbar contains commands for selecting, playing and looping
audio. The bottom toolbar contains commands for zooming in and out, undo and
redo and the ‘last used command’.
5.3. Searching for MP3 or AAC audio files
On Android devices there is an option to search for audio files on your device. This can be done by pressing the top left mp3TrueEdit logo and selecting the Search screen. There you can type in your search filter for the file name or title to narrow down your search. You can then select an audio file in the list to open it for editing.
5.4. Opening an MP3 or AAC file
To open a supported audio file (MP3 or AAC)
you can use the ![]() File | Open menu command and select to
open the file. You can also use the
File | Open menu command and select to
open the file. You can also use the ![]() Import | Browser Import Open menu command to import audio from another App’s storage area (such
as Google Drive or iCloud Drive) and open it in the editor. On iOS
devices you also have the option to use the
Import | Browser Import Open menu command to import audio from another App’s storage area (such
as Google Drive or iCloud Drive) and open it in the editor. On iOS
devices you also have the option to use the ![]() Import | iTunes Import Open menu command to import MP3 or AAC audio from iTunes where they have
previously been downloaded in the iTunes App, so long as they are free from DRM
protection.
Import | iTunes Import Open menu command to import MP3 or AAC audio from iTunes where they have
previously been downloaded in the iTunes App, so long as they are free from DRM
protection.
When an MP3 or AAC file is opened, it will be displayed on the audio display screen as a section or window into the audio file and also on a map view showing the entire content of the audio project. These views show a graphical representation of the audio volume over time in addition to an audio time ruler and a map ruler to aid in navigating through the loaded audio project. The current play position is indicated by the red vertical line and shows where the audio will start playing from when audio playback is started.

You will notice that the audio display screen shows the audio as a series of dark blue vertical bars. Each vertical bar represents a compressed frame of audio in the MP3 or AAC file format with a typical duration of around 25 milliseconds. It is these frames that mp3TrueEdit is able to manipulate directly by cutting, coping or pasting them as a group or by changing the individual volume levels of a section of frames. This allows mp3TrueEdit to do its magic of editing audio files without losing any quality!
You also have the ability to Append Files to an existing editing project and this is explained in more detail in section 5.13.
5.5. Play and review an audio File
Use the following commands on the top toolbar to play, pause or loop audio in an mp3TrueEdit project.
![]() Press the Play
Press the Play ![]() button to play from the Current play position in the audio
file or project. The current play position is indicated by a red vertical line
in the audio display screen. When audio is playing the Play
button will turn into the Pause button.
button to play from the Current play position in the audio
file or project. The current play position is indicated by a red vertical line
in the audio display screen. When audio is playing the Play
button will turn into the Pause button.
![]() Press the Pause
Press the Pause ![]() button to pause or stop playback. When playback is paused the Pause
button changes back to the Play button.
button to pause or stop playback. When playback is paused the Pause
button changes back to the Play button.
![]() Press the Play Sel
Press the Play Sel ![]() (play selection) button to play the currently selected audio. When
the audio selection is playing the Play Sel button turns into the Pause
Sel (pause selection) button. NB: please see section 5.7 on how to select a section of audio.
(play selection) button to play the currently selected audio. When
the audio selection is playing the Play Sel button turns into the Pause
Sel (pause selection) button. NB: please see section 5.7 on how to select a section of audio.
![]() Press the Pause Sel
Press the Pause Sel ![]() button to pause or stop playing back the current selection. When
playback is paused or stopped the Pause Sel button changes back to the Play
Sel button.
button to pause or stop playing back the current selection. When
playback is paused or stopped the Pause Sel button changes back to the Play
Sel button.
![]() You can also loop the playback of the selected audio or loop the
playback of the entire audio project. To do this, simply press the Loop
You can also loop the playback of the selected audio or loop the
playback of the entire audio project. To do this, simply press the Loop ![]() button before
the current playback ends. The Loop button then turns into the Looping
button before
the current playback ends. The Loop button then turns into the Looping ![]() button which
can be turned off by pressing it again.
button which
can be turned off by pressing it again.
5.5.1. Adjusting Playback Volume
You can use the + and – volume buttons on your device to changes the playback volume. mp3TrueEdit responds to the Media system volume level.
NB: To adjust the volume of the exported or converted audio you must use the Normalize command described in section 5.14.1 or one of the other commands in section 5.14 that affect the exported or converted audio such as Fade in or out and volume increase or decrease.
5.6. Navigating audio
For larger audio files or projects the audio
display screen will not show the entire length of the audio but rather a
window into the audio file. In this case the map view will show a condensed
view of the entire audio being edited. The map view will indicate the
audio sections outside of the windowed audio by coloring them in a grayed out
style. This map view can be pressed in order to jump to the same
location in the windowed audio display screen. In addition, the audio
display screen can be pressed and dragged to make finer adjustments to the current
play position of the audio. If you require a finer adjustment of the current
play position, then you can zoom in or out using the Zoom-in ![]() and Zoom-out
and Zoom-out
![]() buttons on
the bottom toolbar before dragging the audio time ruler. You will also
notice that the scale of the audio time ruler will adjust automatically
when zoomed in or out.
buttons on
the bottom toolbar before dragging the audio time ruler. You will also
notice that the scale of the audio time ruler will adjust automatically
when zoomed in or out.
There is also a Navigate Controls popup menu that enables navigation through the audio project in other ways which are explained later is section 5.16.
5.7. Selecting audio for editing or playback
Most audio editing commands will operate on a selected area of audio so to enable these editing commands you must first select a section of audio to edit from within your audio file or project. There are two ways to select audio:
Method 1
1. Press on the map view and/or press and drag on the audio display screen to adjust the current play position to the desired start position.
2.
Then press the Set Start ![]() button. You
will see a green vertical line appearing at the start position.
button. You
will see a green vertical line appearing at the start position.
3. Then press on the map view and/or drag on the audio display screen to adjust the current play position to the desired end position of the selection.
4.
Then press the Set End ![]() button.
button.
5. The selected audio is then highlighted in green.
6. If necessary, the selection start point or selection end point can also be adjusted by moving the play position to the desired new start or new end point and re-pressing Set Start or Set End respectively.
![]() Important Note: When
you see a dotted green line – this shows the selection start and end are
at the same time position. In this case there is nothing selected – so nothing
can be copied or any editing effect applied. If you see an alternate dotted
red and green line, this indicates that the current play position and the
current ‘zero-width’ selection are both at the same location.
Important Note: When
you see a dotted green line – this shows the selection start and end are
at the same time position. In this case there is nothing selected – so nothing
can be copied or any editing effect applied. If you see an alternate dotted
red and green line, this indicates that the current play position and the
current ‘zero-width’ selection are both at the same location.
Method 2
1.
If you wish to select the entire audio in a file
or project, then you can use the Select All ![]() popup menu
command
popup menu
command
5.8. Full Undo and Redo
Any operation or command in mp3TrueEdit can
be undone and redone using the unlimited Undo ![]() and Redo
and Redo
![]() commands to
restore your edits to any previous state since the file was opened. This
feature makes it much easier and safer to perform any editing of your audio
files since if you make a mistake or you want do adjust and improve on any
editing command then you can simply undo any number of commands and repeat the
editing operations.
commands to
restore your edits to any previous state since the file was opened. This
feature makes it much easier and safer to perform any editing of your audio
files since if you make a mistake or you want do adjust and improve on any
editing command then you can simply undo any number of commands and repeat the
editing operations.
NB: If the mp3TrueEdit app is suspended or closed down then the undo history since the file was opened will be lost.
5.8.1. Undo and redo of selections
The Undo and Redo commands in addition to undoing and redoing the actual audio edits can also be used to undo and redo the audio selections (as highlighted in green). This is to make it easier to adjust selections of the exact audio to be edited.
5.9. Cut and paste a selection of the audio
If you want to move a section of your MP3 or AAC audio from one location to another along the audio timeline or even to another loaded mp3TrueEdit project, you can use the Cut and Paste functions.
Method 1
1. First, make a selection of the audio (see section 5.7 above on how to select audio)
2.
Then, press on the popup menu command ![]() followed by
the Cut
followed by
the Cut ![]() command to
remove the section of audio and put it onto the clipboard.
command to
remove the section of audio and put it onto the clipboard.
3.
You can then select a ‘zero-width’ section of
audio by navigating to where you wish to paste the audio as described in
section 5.6 and then pressing the Set Start ![]() button
followed by the Set End
button
followed by the Set End ![]() button without scrolling the current play position
button without scrolling the current play position
4.
The ‘zero-width’ selection point will be
displayed as a dotted line. Then you can press the Paste ![]() button to
paste the previously ‘cut’ section into the new location specified by the dotted
‘zero-width’ selection line.
button to
paste the previously ‘cut’ section into the new location specified by the dotted
‘zero-width’ selection line.
Method 2
1. Cut a section of audio as described in the first part of Method 1 above.
2.
If you then wish to paste the ‘cut’ audio over
another section of audio, replacing the selected audio with the ‘cut’ audio,
then simply select the audio that you want to replace and the press the Paste
![]() button to
paste the previously ‘cut’ section over the new selection.
button to
paste the previously ‘cut’ section over the new selection.

Note![]() : You may notice that where audio has been cut and pasted there is a
change in color at the edit points to a light blue frame color. This is to
indicate where edits have been made and we call them ‘cellotape markers’, analogous
to the old way of cutting magnetic audio tape and sticking the tape back together
using cellotape.
: You may notice that where audio has been cut and pasted there is a
change in color at the edit points to a light blue frame color. This is to
indicate where edits have been made and we call them ‘cellotape markers’, analogous
to the old way of cutting magnetic audio tape and sticking the tape back together
using cellotape.
5.10. Copy and paste a selection of the audio
To copy a section of your MP3 or AAC audio and paste to another position along the audio timeline in the file or to another file, use the Copy and Paste commands as described below.
Method 1
1.
To copy a section of audio from one part of your
MP3 or AAC file to another, first select the audio that you wish to copy (see
section 5.7). Then press
the Copy ![]() button.
button.
2.
Second, select a ‘zero-width’ section of audio
by navigating to where you wish to paste the audio as described in section 5.6 and then pressing the Set Start ![]() button
followed by the Set End
button
followed by the Set End ![]() button without scrolling the current play position
button without scrolling the current play position
3.
The ‘zero-width’ selection point will be
displayed as a dotted line. Then you can press the Paste ![]() button to
paste the previously ‘copied’ section into the location specified by the dotted
‘zero-width’ selection line.
button to
paste the previously ‘copied’ section into the location specified by the dotted
‘zero-width’ selection line.
Method 2
1. Copy a section of audio as described in the first part of Method 1 above.
2.
If you then wish to paste the ‘copied’ audio
over another section of audio, replacing the selection with the ‘copied’ audio,
then simply select the audio that you want to replace and the press the Paste
![]() button to
paste the previously ‘copied’ section over the new selection.
button to
paste the previously ‘copied’ section over the new selection.
![]() Important Note: You
can copy from different files only if the MP3 or AAC compression format is
compatible, for example, sampling frequency (expressed in Hz) must be
same and mono and stereo formats cannot be mixed. If the bit
rate is different, it is still compatible but the exported MP3 or AAC file will
be converted to a variable bit rate file format.
Important Note: You
can copy from different files only if the MP3 or AAC compression format is
compatible, for example, sampling frequency (expressed in Hz) must be
same and mono and stereo formats cannot be mixed. If the bit
rate is different, it is still compatible but the exported MP3 or AAC file will
be converted to a variable bit rate file format.
5.11. Delete a section of the audio
Method
1. First, select the section of the audio to be deleted as described in section 5.7.
2.
Then press on the Delete ![]() button to
delete the selected section.
button to
delete the selected section.
Note![]() : The selection either side of
the deleted audio are joined together, leaving no gaps. The section you have
deleted is indicated by a vertical light blue line or cellotape marker on the
first frame of a new ‘non-contiguous’ part in the audio.
: The selection either side of
the deleted audio are joined together, leaving no gaps. The section you have
deleted is indicated by a vertical light blue line or cellotape marker on the
first frame of a new ‘non-contiguous’ part in the audio.
Note![]() : Unlike many other ‘lossless’
MP3 audio editors mp3TrueEdit will preserve the continuity of audio when
joining MP3 frames after delete, copy or paste operations
have been applied.
: Unlike many other ‘lossless’
MP3 audio editors mp3TrueEdit will preserve the continuity of audio when
joining MP3 frames after delete, copy or paste operations
have been applied.
5.12. Crop a section of the audio
Method
1. First, select the section of the audio you wish to keep (see section 5.7 on how to do this).
2.
Then, press on the popup menu command ![]() followed by
the Crop
followed by
the Crop ![]() command and
the audio before and after the selected audio will be deleted.
command and
the audio before and after the selected audio will be deleted.
5.13. Combine/append several audio files
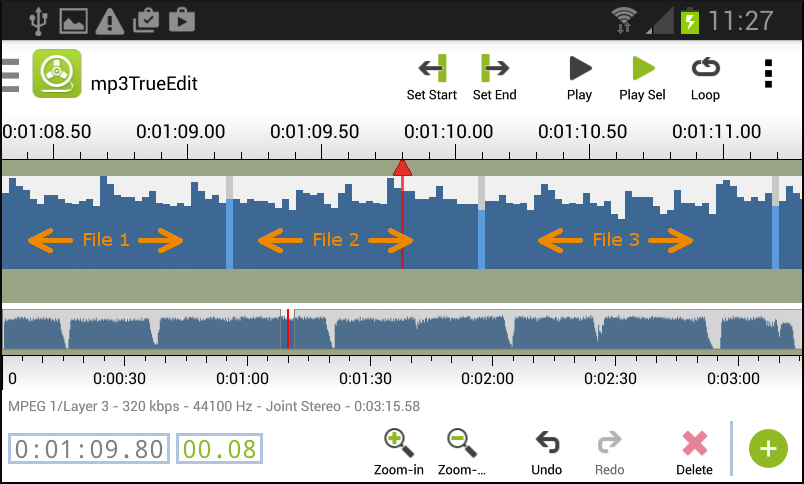
There are two ways to combine a number of audio files.
Method 1 – Using the Open command
1. Use the ![]() File | Open menu command to launch
the open dialog where you can select one or more files that you want to
combine. Multiple files can be selected by dragging over a number of adjacent
files.
File | Open menu command to launch
the open dialog where you can select one or more files that you want to
combine. Multiple files can be selected by dragging over a number of adjacent
files.
2. Press the Open button and the group of files will be loaded into your project.
3. If there are additional files in the open dialog that you want to combine or you want to combine files in a different order, then you must add them using the Append command below.
4. NB: Opening more than one file at a time is not supported on all platforms.
Method 2 – Using the Append command
1.
Use the ![]() File | Append menu command to launch the append dialog where you can select the
file or files that you wish to append to an existing project. Alternatively,
you can append audio using the
File | Append menu command to launch the append dialog where you can select the
file or files that you wish to append to an existing project. Alternatively,
you can append audio using the ![]() Import | Browser Import Append... or the
Import | Browser Import Append... or the ![]() Import | iTunes Import Append... commands
to append compatible audio to the end of the current project. If later you
decide to append other files to the combined files in the project, you can use
the ‘Append’ menu commands again.
Import | iTunes Import Append... commands
to append compatible audio to the end of the current project. If later you
decide to append other files to the combined files in the project, you can use
the ‘Append’ menu commands again.
Note![]() : When you have
combined all the files that you need in a project you may wish to use the
: When you have
combined all the files that you need in a project you may wish to use the ![]() File |Save
Project… menu command to save the list of combined
files as a project file for further editing later. When you are happy with the
edited project you can use the
File |Save
Project… menu command to save the list of combined
files as a project file for further editing later. When you are happy with the
edited project you can use the ![]() Export |Export All As… menu command to save
the combined files as a single audio file.
Export |Export All As… menu command to save
the combined files as a single audio file.
5.14. The effects functions
The Effects functions currently include easy to use normalize, fade-in, fade-out, volume adjustment commands and special functions to silence or remove previously applied silencing to selected audio. In addition, you can insert a length of silent audio into any location within an editing project.
5.14.1. Adjusting the volume – Normalize
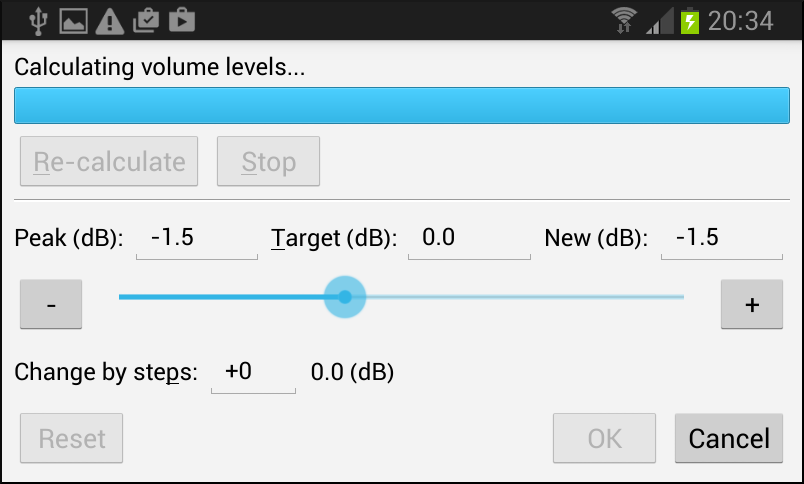
1. To increase the volume to the maximum level without distorting the audio quality, first select the audio section you wish to adjust.
2. Then, press on the popup menu command ![]() followed by the Normalize
followed by the Normalize ![]() command to display normalize dialog.
command to display normalize dialog.
3. When the audio has been analyzed the Peak (dB): value shows the maximum volume in decibels that was found in the selected audio.
4. You are then able to select the Target (dB): level in decibels that you wish to normalize to. The slider and Change by steps: value will then automatically be set so that the selected audio will be adjusted to your desired target value in decibels.
Note![]() : A value of 0 dB (0 decibels)
represents the maximum volume that can be played back without distortion and
the more negative the value the quieter the sound will be played back.
: A value of 0 dB (0 decibels)
represents the maximum volume that can be played back without distortion and
the more negative the value the quieter the sound will be played back.
5. If desired the horizontal volume slider or the Change by steps: value can be adjusted manually and the resulting maximum volume can be seen in the New (dB): field.
6. If you have changed the volume level manually you can also reset the volume level to the automatically calculated value by pressing the Reset button.
5.14.2. Adjusting the volume - the fade in and out
The volume of a selected range of audio may be faded in by gradually reducing the volume to the beginning or faded out be gradually reducing it to the end.
Method
1. First, select the section of audio to adjust.
2. Then, press the popup menu command ![]() followed by the Fade In
followed by the Fade In ![]() button so that the volume is gradually increased
over time or alternatively you can use the Fade Out
button so that the volume is gradually increased
over time or alternatively you can use the Fade Out ![]() button to gradually decrease the volume over time.
button to gradually decrease the volume over time.
Tip![]() : You can subsequently increase
the Fade In and Fade Out effect by repeatedly pressing the Fade
In and Fade Out buttons until the desired fade level is reached. You
can also press the Play Sel
: You can subsequently increase
the Fade In and Fade Out effect by repeatedly pressing the Fade
In and Fade Out buttons until the desired fade level is reached. You
can also press the Play Sel ![]() (play selection) button to listen to the faded audio level at any
time.
(play selection) button to listen to the faded audio level at any
time.
Tip![]() : If you not happy with what you
are hearing, press on the Undo
: If you not happy with what you
are hearing, press on the Undo ![]() button to undo the faded in or out steps.
button to undo the faded in or out steps.
Tip![]() : If you wish to change the
amount of fade in or out that is performed when a Fade In or Fade Out
button is pressed then you can press the top left logo and then select the Settings
function to set the Fade Volume By value for the fade-in or fade-out volume
change that will be applied each time a fade command is performed.
: If you wish to change the
amount of fade in or out that is performed when a Fade In or Fade Out
button is pressed then you can press the top left logo and then select the Settings
function to set the Fade Volume By value for the fade-in or fade-out volume
change that will be applied each time a fade command is performed.
5.14.3. Adjusting the volume - volume increase or decrease
The volume level of the selected audio can also be increased or decreased to your desired level.
Method
1. First, select the section of audio to adjust.
2. Then, press either the Vol Inc ![]() (volume increase) or Vol Dec
(volume increase) or Vol Dec ![]() volume
decrease buttons to increase or decrease the volume of the selected audio.
volume
decrease buttons to increase or decrease the volume of the selected audio.
Tip![]() : If you wish to change the
amount that the volume is increased or decreased by when a Vol Inc or Vol
Dec button is pressed then you can press the top left logo and then select
the Settings function to set the Change Volume By value for the volume
increase or decrease value that will be applied each time a change volume
command is performed.
: If you wish to change the
amount that the volume is increased or decreased by when a Vol Inc or Vol
Dec button is pressed then you can press the top left logo and then select
the Settings function to set the Change Volume By value for the volume
increase or decrease value that will be applied each time a change volume
command is performed.
5.14.4. Adjusting the volume - silence or remove silence
To make the currently selected audio completely silent (Redacted) without affecting the total length of the audio file or project,
1. First select the audio you wish to make silent using any of the selection methods.
2. Then use the effects overflow command ![]() Effects | Silence to make that selected audio completely silent. You will notice that
silenced audio is shown in the audio display screen as a light grey-blue
color.
Effects | Silence to make that selected audio completely silent. You will notice that
silenced audio is shown in the audio display screen as a light grey-blue
color.
3. To remove any previously applied silencing of a section of audio,
any part of a silenced section of can be restored to its previous volume level
by selecting that portion and using the effects overflow command ![]() Effects | Remove Silencing to remove
the previously applied silence effect. Again this is done without affecting the
total length of a project.
Effects | Remove Silencing to remove
the previously applied silence effect. Again this is done without affecting the
total length of a project.
Note![]() : Silence mode only suppresses
the volume in a project it is not lost until the audio in a project is exported
to MP3 or AAC format. When finally exported it will then be completely removed or
redacted and will not be recoverable from the exported audio.
: Silence mode only suppresses
the volume in a project it is not lost until the audio in a project is exported
to MP3 or AAC format. When finally exported it will then be completely removed or
redacted and will not be recoverable from the exported audio.
5.14.5. Inserting Silence
The Insert Silence command allows you to insert a section of silent audio at the current play position marker. To insert silence,
1. Navigate through the project so that the current play position is at the start of where you want to insert the silence.
2. Press the Ins Silence ![]() button. A dialog box will appear. Enter the number of seconds of
silence to insert and press the OK button. You will notice the silenced
audio inserted at the current play position in the audio display screen.
button. A dialog box will appear. Enter the number of seconds of
silence to insert and press the OK button. You will notice the silenced
audio inserted at the current play position in the audio display screen.
5.15. Split an audio file into tracks
Sometimes you may want to split an audio file into multiple tracks and save each track into a separate file. The steps involved are as follows:
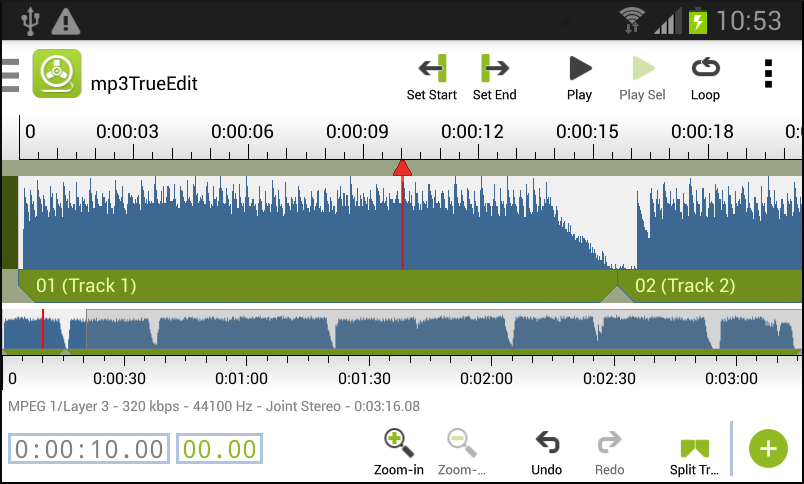
1. To mark the start position of the track, press and drag the audio display screen to move the current play position to the desired start position of the track.
2. Then press on the Track Start ![]() button to mark the start position. A green colored track bar will
appear at the bottom of the audio display screen and by default, it will
mark the end of the audio project as the track end position.
button to mark the start position. A green colored track bar will
appear at the bottom of the audio display screen and by default, it will
mark the end of the audio project as the track end position.
3. To mark the end position of the track, drag the audio display screen to move the current play position to the desired end position of the track.
4. Then press on the Track End button ![]() to mark the
end position. The new track end position will be updated to the current play
position.
to mark the
end position. The new track end position will be updated to the current play
position.
5. You can also use the Split Track ![]() command to
divide an existing track into two adjacent tracks. Additionally, if this
command is used on a section of audio that is not within a track two new
adjacent tracks will be created.
command to
divide an existing track into two adjacent tracks. Additionally, if this
command is used on a section of audio that is not within a track two new
adjacent tracks will be created.
6. To delete a previously created track the Del Track (delete
track) command can be used by navigating the current play position to
within the track you with to delete and then pressing the Del Track ![]() button.
button.
7. You can also use the Track Start and Track End buttons to adjust the track start or end positions of any existing track. Pressing on the Track Start button will move the start position of the current or next track to the current play position and pressing on the Track End button will move the end position of the current or previous track to the current play position.
When creating tracks in this way they will be displayed as green bars with beveled edges with a track name and number at the bottom of the audio display screen as shown above. The track names and other tagging information for each track can set using the tagging facility of mp3TrueEdit. This tagging facility is accessed by pressing the top left logo and selecting the Tags screen. Once a project is split into tracks these individual tracks can be exported or converted as separate files as outlined in sections 5.19 or 5.20 respectively.
5.16. Navigate Controls
Use the File | Navigate Controls menu command to show the
popup Navigate Controls toolbar. This will show you a number of command
buttons that will enable you to navigate through the open project more easily.
Use the blue left ![]() and right
and right ![]() pointing arrows at the ends of
the Navigate Controls popup to scroll to reveal any extra navigate controls to
the left or right.
pointing arrows at the ends of
the Navigate Controls popup to scroll to reveal any extra navigate controls to
the left or right.
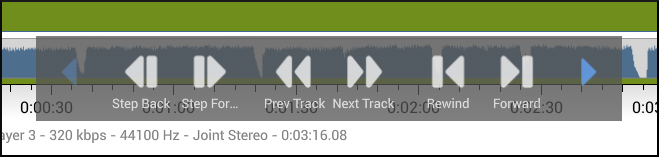
![]() The Step Back
The Step Back ![]() toolbar
command will scroll the audio display screen one audio frame backwards
and the Step Forwards
toolbar
command will scroll the audio display screen one audio frame backwards
and the Step Forwards ![]() command will scroll one audio frame forwards.
command will scroll one audio frame forwards.
![]() If you have split your project into one or more tracks, then the Prev
Track
If you have split your project into one or more tracks, then the Prev
Track ![]() (previous
track) command will scroll to the start or end of any previous tracks before
the current play position. Similarly, the Next Track
(previous
track) command will scroll to the start or end of any previous tracks before
the current play position. Similarly, the Next Track ![]() command will
scroll to the start or end of any following tracks after the current play
position.
command will
scroll to the start or end of any following tracks after the current play
position.
![]() The Rewind
The Rewind ![]() command will scroll the audio to the start of the project and the Forward
command will scroll the audio to the start of the project and the Forward
![]() command will
scroll to the end of the project.
command will
scroll to the end of the project.
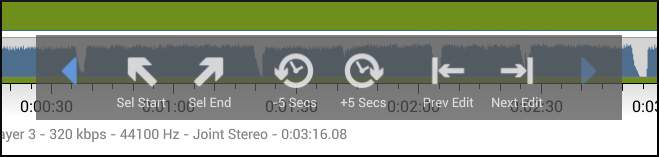
![]() Use the Sel Start
Use the Sel Start ![]() (selection start) command to scroll to the start of the current
selection and use the Sel End
(selection start) command to scroll to the start of the current
selection and use the Sel End ![]() (selection end) command to scroll to the end of the selection.
(selection end) command to scroll to the end of the selection.
![]() To further aid navigation you are able to scroll forwards or
backwards a set time interval using the -N Secs
To further aid navigation you are able to scroll forwards or
backwards a set time interval using the -N Secs ![]() (back N
seconds) command and the +N Secs
(back N
seconds) command and the +N Secs ![]() (forward N seconds) command. The number of seconds scrolled
forwards or backwards is determined by the Navigate Step Seconds value
in the Settings screen.
(forward N seconds) command. The number of seconds scrolled
forwards or backwards is determined by the Navigate Step Seconds value
in the Settings screen.
![]() If your project has been edited so that it
contains removed or moved sections of audio or you have combined two or more audio
files into a project, then your project will contain non-contiguous sections of
audio that are marked with the light blue cellotape frame marks described
earlier. You can navigate to these non-contiguous sections of audio using the Prev
Edit
If your project has been edited so that it
contains removed or moved sections of audio or you have combined two or more audio
files into a project, then your project will contain non-contiguous sections of
audio that are marked with the light blue cellotape frame marks described
earlier. You can navigate to these non-contiguous sections of audio using the Prev
Edit ![]() (previous
edit) and Next Edit
(previous
edit) and Next Edit ![]() commands.
commands.
Finally uncheck the File | Navigate Controls menu command to dismiss the Navigate Controls popup.
5.17. Pitch/Tempo Controls
Use the File | Pitch/Tempo Controls menu command to show the popup Pitch/Tempo Controls toolbar. This will show two controls, one for changing the playback pitch without affecting the tempo and one for changing the tempo without affecting the pitch. You can use these controls, for example, to change the pitch of a song to match your singing range or to speed up or slow down a recording of a meeting to easily review the content or make notes.
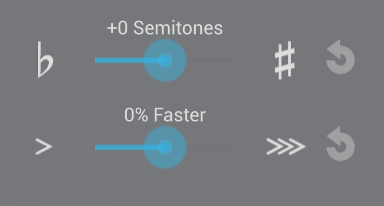
![]() The ‘–1 semitone’
The ‘–1 semitone’ ![]() button will reduce the playback pitch by 1 semitone.
button will reduce the playback pitch by 1 semitone.
![]() The ‘+1 semitone’
The ‘+1 semitone’ ![]() button will increase the playback pitch by 1 semitone.
button will increase the playback pitch by 1 semitone.
![]() The slider can also be used and the change the pitch and the value
is displayed above it.
The slider can also be used and the change the pitch and the value
is displayed above it.
![]() The ‘slower’
The ‘slower’ ![]() and ‘faster’
and ‘faster’ ![]() buttons or
the associated slider can also be used to adjust the playback tempo without
adjusting the pitch. The percentage change in speed is shown above the slider.
buttons or
the associated slider can also be used to adjust the playback tempo without
adjusting the pitch. The percentage change in speed is shown above the slider.
![]() Finally, use the associated ‘reset’
Finally, use the associated ‘reset’ ![]() buttons to reset the pitch or tempo to normal playback settings.
buttons to reset the pitch or tempo to normal playback settings.
You can uncheck the Pitch/Tempo Controls menu command to dismiss the Pitch/Tempo Controls popup.
In addition to changing the pitch and tempo during playback the Pitch/Tempo Controls toolbar can also be used to change the pitch and tempo of converted audio. See section 5.20. However, this is not the case for exported audio where the Pitch/Tempo Controls toolbar settings do not affect the exported audio. This is because exported audio can only have its volume level changed without losing quality.
5.18. Saving projects files
We recommend that you save your work as a project file that contains a list of all the edits you have made to your source audio files. This will enable you to re-load the project at a later date and modify any edits you have done to your project.
To save your work as a project you can use
the ![]() File | Save Project... or
File | Save Project... or ![]() File | Save Project As... menu
commands to launch the project save dialog.
File | Save Project As... menu
commands to launch the project save dialog.
![]() Important Note: When
you save an mp3TrueEdit project file (.mteproj) what you are saving is just a
list of commands that you applied to your source audio files, it does not
contain any actual audio it’s self but merely links to your original source audio
files. It is very important you do not move, delete or modify these source
audio files for your project, or you will no longer be able to open your associated
projects or export or convert them.
Important Note: When
you save an mp3TrueEdit project file (.mteproj) what you are saving is just a
list of commands that you applied to your source audio files, it does not
contain any actual audio it’s self but merely links to your original source audio
files. It is very important you do not move, delete or modify these source
audio files for your project, or you will no longer be able to open your associated
projects or export or convert them.
5.19. Exporting files and Tracks
When you have finished editing audio in an mp3TrueEdit project you can then export audio in your original audio format without any loss in quality at all.
![]() Use the
Use the ![]() Export | Export All As... menu
command once you are happy with all the editing you have done in a project; this
command will save the entire audio in your project to a single audio file.
Export | Export All As... menu
command once you are happy with all the editing you have done in a project; this
command will save the entire audio in your project to a single audio file.
![]() Use the
Use the ![]() Export | Export Selection As... menu
command if you wish only to export the currently selected audio to a new audio
file.
Export | Export Selection As... menu
command if you wish only to export the currently selected audio to a new audio
file.
![]() Use the
Use the ![]() Export | Export Tracks... menu
command if you have split your audio project into multiple tracks (see section 5.15). This then allows you to save
each track as a series of separate files, one for each track into the folder
selected in the track save dialog.
Export | Export Tracks... menu
command if you have split your audio project into multiple tracks (see section 5.15). This then allows you to save
each track as a series of separate files, one for each track into the folder
selected in the track save dialog.
Note![]() : Exported audio files using any
of these methods can contain tagging information such as the title and artist
for a track. This tagging information can be configured for projects with or
without separate tracks using the Tags screen which can be navigated to
by pressing the top left mp3TrueEdit logo.
: Exported audio files using any
of these methods can contain tagging information such as the title and artist
for a track. This tagging information can be configured for projects with or
without separate tracks using the Tags screen which can be navigated to
by pressing the top left mp3TrueEdit logo.
Note![]() : When saving tracks into a folder the track name
and track number in the tagging information is used to name the file. This can
also be customized as described in section 7.
: When saving tracks into a folder the track name
and track number in the tagging information is used to name the file. This can
also be customized as described in section 7.
5.20. Converting files and Tracks
As an alternative to exporting audio without changing the format (or losing quality) you can now change the encoded format or encoder settings and convert your edits to a new format of audio file (MP3, AAC). Converting audio in this way also allows changes in pitch and tempo to be saved to a new audio file.
Note![]() : When converting files or tracks the audio
settings used for the conversion are taken from the Settings screen. See
section 8.
: When converting files or tracks the audio
settings used for the conversion are taken from the Settings screen. See
section 8.
Please Note: If you use the 'Convert Audio ...' options rather than 'Export Audio ...' options then some audio quality loss will be involved since re-compressing audio will always lose some quality.
![]() Use the
Use the ![]() Convert | Convert All As... menu
command once you are happy with all the editing you have done in a project; this
command will save the entire audio in your project to a single audio file with
a new file format.
Convert | Convert All As... menu
command once you are happy with all the editing you have done in a project; this
command will save the entire audio in your project to a single audio file with
a new file format.
![]() Use the
Use the ![]() Convert | Convert Selection As... menu
command if you wish only to convert the currently selected audio to a new format
audio file.
Convert | Convert Selection As... menu
command if you wish only to convert the currently selected audio to a new format
audio file.
![]() Use the
Use the ![]() Convert | Convert Tracks... menu
command if you have split your audio project into multiple tracks (see section 5.15). This then allows you to save
each track as a series of separate files with the new audio format, one for each
track into the folder selected in the track save dialog.
Convert | Convert Tracks... menu
command if you have split your audio project into multiple tracks (see section 5.15). This then allows you to save
each track as a series of separate files with the new audio format, one for each
track into the folder selected in the track save dialog.
Note![]() : Converted audio files using any
of these methods can contain tagging information such as the title and artist
for a track. This tagging information can be configured for projects with or
without separate tracks using the Tags screen which can be navigated to
by pressing the top left mp3TrueEdit logo.
: Converted audio files using any
of these methods can contain tagging information such as the title and artist
for a track. This tagging information can be configured for projects with or
without separate tracks using the Tags screen which can be navigated to
by pressing the top left mp3TrueEdit logo.
Note![]() : When saving tracks into a folder the track name
and track number in the tagging information is used to name the file. This can
also be customized as described in section 7.
: When saving tracks into a folder the track name
and track number in the tagging information is used to name the file. This can
also be customized as described in section 7.
6. Recording with mp3TrueEdit
mp3TrueEdit has a built-in recording facility for recording audio using the AAC or MP3 file formats. You may wish to connect to an external recording app for recording either MP3 or AAC audio if you have one installed. To use a pre-installed external recording app with the Android version of mp3TrueEdit you can check the Use External Recording App feature in the Settings screen. However, if you do use an external recording app you must configure it to record using either the MP3 (.mp3) or AAC (.m4a) file format.
6.1. Using the recording function
To use the internal recording function, press the top left mp3TrueEdit logo and select the Record screen.
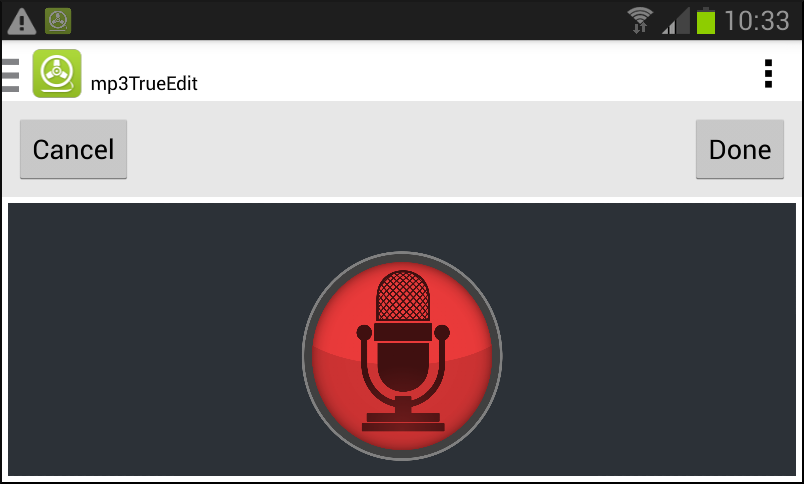
Then simply press the microphone record button and it will turn red when recording. To stop recording just press the record button again. Each time you press the record button a recording will be made into a new file. Press the Done button when you have finished your recording session to load all the recordings into a new mp3TrueEdit project while switching to the Edit screen. Alternatively, you can cancel and delete the recordings by pressing the Cancel button.
Note![]() : When recording the audio settings used for the
recorded file format are taken from the Settings screen. See section 8.
: When recording the audio settings used for the
recorded file format are taken from the Settings screen. See section 8.
7. Tagging with mp3TrueEdit
mp3TrueEdit projects can be edited to contain MP3 or AAC tagging information. This tagging information will be saved to the exported or converted audio files when any of the File | Export ... or File | Convert ... commands are used. The track titles entered into the Tags screen will also be used with the track number to display the track names shown in the Edit screen. You can also use the Track Naming String macro in the Settings screen to customize track names that are shown in the Edit screen. This can be done using any combination of track title, track artist or track number to generate a track name which is displayed in the Edit screen and which is also used to generate individual filenames when exporting or converting tracks. This will allow you to store information on your audio track, such as the track 'title', track 'number', 'artist', 'album', ’genre’ etc. The information can then be displayed in your favorite audio player application or on your portable player such as an iPod. You are also able to edit ‘album artwork’ that is associated with each track, adding new artwork by pasting from the clipboard or opening an image file (or audio file with an embedded image).
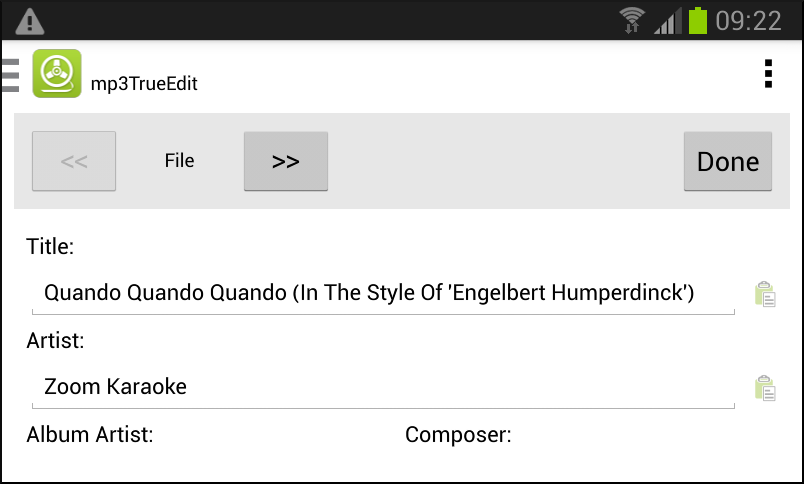
To start editing tagging information for the current project press on the top left mp3TrueEdit logo and select Tags. You can then use the << and >> buttons to switch between displaying and editing tags from either the first file loaded in a project (‘File’) or any of the tracks added to a project as shown in section 5.15 (‘Track: N’). When using the Export All As... or Convert All As... menu commands or the Export Selection As... or Convert Selection As... menu commands the tagging information in the ‘File’ page will be used for the single file exported or converted. However, when using the Export Tracks... or Convert Tracks... menu commands the tagging information for each track number (‘Track: N’) will be used for each respective exported or converted track.
When you have finished editing the tag information for the ‘File’ or any individual track then pressing the >> or << buttons will save that track information and then start editing the next or previous track respectively.
You can also use the top right menu commands ![]() Copy All or
Copy All or ![]() Paste All to
copy all the track fields to the clipboard and paste into another track. Alternatively,
if you have copied all of the tracks fields using the Copy All command
then you can also use the individual ‘paste’
Paste All to
copy all the track fields to the clipboard and paste into another track. Alternatively,
if you have copied all of the tracks fields using the Copy All command
then you can also use the individual ‘paste’ ![]() buttons next to each field of a track to individually paste the various
fields copied to the clipboard into a new track’s field.
buttons next to each field of a track to individually paste the various
fields copied to the clipboard into a new track’s field.
NB: Some fields in the Tags screen are not enabled for AAC (.m4a) files due to different tagging standards.
8. mp3TrueEdit Settings
There are various settings available to customize the appearance and function of mp3TrueEdit which can be changed in the Settings screen. To access the Settings screen simply press the top left mp3TrueEdit logo and select Settings. When you have finished changing your settings pressing the Done button will then return you to the Edit screen.
9. Glossary
![]() 24bit Recording – normally 16 bits are
used to record audio to CD quality however if your audio interface supports 24-bit
recording then these extra bits can improve the quality of quieter sections of
audio especially when the volume is increased later using mp3TrueEdit or other
audio editors.
24bit Recording – normally 16 bits are
used to record audio to CD quality however if your audio interface supports 24-bit
recording then these extra bits can improve the quality of quieter sections of
audio especially when the volume is increased later using mp3TrueEdit or other
audio editors.
![]() Audio display screen- It shows a
graphical representation of the audio volume over time. Each vertical bar is a
frame of compressed audio. The height of the blue bar is an indication of the
volume level for that small section of audio. However, this frame volume
indicator is only a visual guide to the actual volume of the decompressed audio
that you hear during playback.
Audio display screen- It shows a
graphical representation of the audio volume over time. Each vertical bar is a
frame of compressed audio. The height of the blue bar is an indication of the
volume level for that small section of audio. However, this frame volume
indicator is only a visual guide to the actual volume of the decompressed audio
that you hear during playback.
![]() Bit rate - a measure of is how much the
file is being compressed. The lower the bitrate, the more the file has been
compressed and the smaller the resulting file size, this will also result in a
lower quality when playing back the audio.
Bit rate - a measure of is how much the
file is being compressed. The lower the bitrate, the more the file has been
compressed and the smaller the resulting file size, this will also result in a
lower quality when playing back the audio.
![]() Compressed audio frame – MP3 and AAC
format files compress audio into discrete packets of information which are
called frames. Each frame is of a fixed length and mp3TrueEdit allows you to
edit audio down to individual frame boundaries and also change the volume of
these frames. These frames are shown as blue bars in the audio display
screen. Editing audio files with mp3TrueEdit will allow you to
cut/copy/paste or delete any number of frames represented by the blue vertical
bars and also allow you to change the volume levels of any individual or group
of frames. This is done in a way that does not lose any of the quality of the
original AAC or MP3 recording so you won’t degrade the quality of your final audio
file by de-compressing and re-compressing the audio.
Compressed audio frame – MP3 and AAC
format files compress audio into discrete packets of information which are
called frames. Each frame is of a fixed length and mp3TrueEdit allows you to
edit audio down to individual frame boundaries and also change the volume of
these frames. These frames are shown as blue bars in the audio display
screen. Editing audio files with mp3TrueEdit will allow you to
cut/copy/paste or delete any number of frames represented by the blue vertical
bars and also allow you to change the volume levels of any individual or group
of frames. This is done in a way that does not lose any of the quality of the
original AAC or MP3 recording so you won’t degrade the quality of your final audio
file by de-compressing and re-compressing the audio.
![]() Decibels (dB) – a way of showing the
loudness of a sound using a logarithmic scale which is closer to how we
perceive the volume of sound. A volume of 1dB is at the limit of what the human
ear can hear and volume of 80dB or higher is considered loud. However, in
software applications where the volume of your speakers is not known the
highest volume is defined a 0 and the more negative the decibel reading the
quieter the sound.
Decibels (dB) – a way of showing the
loudness of a sound using a logarithmic scale which is closer to how we
perceive the volume of sound. A volume of 1dB is at the limit of what the human
ear can hear and volume of 80dB or higher is considered loud. However, in
software applications where the volume of your speakers is not known the
highest volume is defined a 0 and the more negative the decibel reading the
quieter the sound.
![]() Encoder – the software that is used to
convert audio from a sound card input device into the compressed audio file
format. Converting to the MP3 or AAC file format will cause some loss of
quality from the original uncompressed audio but will substantially reduce the
file size required to store the audio. Also any subsequent decompression and
recompression will also cause additional loss in quality. Note:
mp3TrueEdit will not decompress and recompress audio when editing MP3 or AAC
files and so will not cause a further loss of quality from the originally
encoded audio file.
Encoder – the software that is used to
convert audio from a sound card input device into the compressed audio file
format. Converting to the MP3 or AAC file format will cause some loss of
quality from the original uncompressed audio but will substantially reduce the
file size required to store the audio. Also any subsequent decompression and
recompression will also cause additional loss in quality. Note:
mp3TrueEdit will not decompress and recompress audio when editing MP3 or AAC
files and so will not cause a further loss of quality from the originally
encoded audio file.
![]() Mono or stereo - Mono sound uses
only a single channel while stereo sound uses two channels for the left
and right ears. Stereo sound gives you a more natural listening
experience compared to mono.
Mono or stereo - Mono sound uses
only a single channel while stereo sound uses two channels for the left
and right ears. Stereo sound gives you a more natural listening
experience compared to mono.
![]() Sampling frequency - the
number of times per second audio is sampled and stored as a number. The more samples taken per second, the more accurate the digital
representation of the sound can be. For example, the current sample rate for
CD-quality audio is 44.1 KHz (44,100 samples per second).
Sampling frequency - the
number of times per second audio is sampled and stored as a number. The more samples taken per second, the more accurate the digital
representation of the sound can be. For example, the current sample rate for
CD-quality audio is 44.1 KHz (44,100 samples per second).
![]() Time ruler – A time ruler has now been
added to the audio display screen and the map view. This is to
aid in seeing how long the audio sequences and edits are.
Time ruler – A time ruler has now been
added to the audio display screen and the map view. This is to
aid in seeing how long the audio sequences and edits are.
![]() VU meter – located below the audio map
view is a volume indicator that displays the loudness of an audio signal. For
playback and recording, the optimum level is between the green and yellow bars but
try avoiding the red bars for long periods.
VU meter – located below the audio map
view is a volume indicator that displays the loudness of an audio signal. For
playback and recording, the optimum level is between the green and yellow bars but
try avoiding the red bars for long periods.